솔미는 성장중
Canvas 태그를 사용해보자 (2) - gooey 효과를 적용한 무작위 파티클 만들기 ! 본문
index.html은 크게 수정할 게 없으니 1번 글을 참고하자!
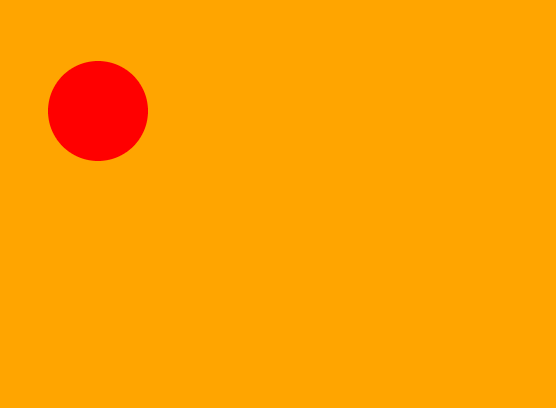
index.js에서 우선 arc를 이용해 원을 그려준다.
const canvas = document.querySelector("canvas");

const ctx = canvas.getContext("2d");
const dpr = window.devicePixelRatio;

const canvasWidth = 300;
const canvasHeight = 300;
canvas.style.width = canvasWidth + "px";
canvas.style.height = canvasHeight + "px";
canvas.width = canvasWidth * dpr;
canvas.height = canvasHeight * dpr;
ctx.scale(dpr, dpr);

// 원 그리기 (x, y, 반지름, 각도시작, 각도끝, 시계/반시계)
ctx.beginPath();
ctx.arc(100, 100, 50, 0, Math.PI * 2); // 라디안 값을 이용하므로 PI를 사용해야 함.
ctx.fillStyle = "red";
ctx.fill(); //ctx.stroke -> 이거 이용하면 선
ctx.closePath();
우리는 여기저기 만들어지는 원을 만들고 싶은 것이므로 class를 이용해서 만들어주어야 한다.
따라서 앞서 작성한 코드에서 원을 그리던 부분을 아래와 같이 수정해주자.
class Particle{
  constructor(x, y, radius){ //class에 instance객체를 생성하고 초기화 해주기 위해 필수적
    this.x = x;
    this.y = y;
    this.radius = radius; // 이로써 class 내에서 값에 접근 가능
  }
  draw(){
  // 원 그리기 (x, y, 반지름, 각도시작, 각도끝, 시계/반시계)
  ctx.beginPath();
  ctx.arc(this.x, this.y, this.radius, 0, Math.PI * 2);
  ctx.fillStyle = "red";
  ctx.fill(); //ctx.stroke
  ctx.closePath();
  }
}

const x = 100;
const y = 100;
const radius = 50;
const particle = new Particle(x, y, radius); // 새로운 instance 생성
particle.draw();
보여지는 모양은 같지만, 아까는 하나의 원이었다면 이제는 같은 자리에 여러 원이 그려지고 있는 것이다!
이제 여기에 animation을 적용해보자.
animation을 적용할 때 fps를 설정해줘야 모든 모니터에서 주사율에 관계없이 같은 애니메이션을 볼 수 있다.
const canvas = document.querySelector("canvas");

const ctx = canvas.getContext("2d");
const dpr = window.devicePixelRatio;

// 전체 화면
const canvasWidth = innerWidth;
const canvasHeight = innerHeight;
canvas.style.width = canvasWidth + "px";
canvas.style.height = canvasHeight + "px";
canvas.width = canvasWidth * dpr;
canvas.height = canvasHeight * dpr;
ctx.scale(dpr, dpr);

class Particle {
  constructor(x, y, radius) {
    this.x = x;
    this.y = y;
    this.radius = radius;
  }
  draw() {
    ctx.beginPath();
    ctx.arc(this.x, this.y, this.radius, 0, Math.PI * 2);
    ctx.fillStyle = "red";
    ctx.fill();
    ctx.closePath();
  }
}

const x = 100;
const y = 100;
const radius = 50;
const particle = new Particle(x, y, radius); // 새로운 instance 생성

// 기본적으로 모니터 주사율(ex.144hz)에 따라 그리는 횟수가 정해짐. (ex. 1초에 144번)
// 즉, 모니터마다 다른 결과. -> 같은 속도로 동작하게 하려면 fps를 사용하기 -> 60fps 조건에 맞춰보자
let interval = 1000 / 60;
let now, delta;
let then = Date.now();

function animate() {
  window.requestAnimationFrame(animate); // 매 프레임 무한으로 실행되는 함수
  now = Date.now();
  delta = now - then;
  if (delta < interval) return ctx.clearRect(0, 0, canvasWidth, canvasHeight); // canvas를 초기화

  particle.y += 1;
  particle.draw();

  then = now - (delta % interval);
}
animate();
이제 여러 개의 파티클을 만들어보자
각각의 파티클은 random한 x,y,radius,vy를 갖는다.
그리고 화면 밖으로 넘어가면 다시 값을 세팅해주어 자연스럽게 재생성되는 것처럼 보이게 만들었다.
class Particle {
  constructor(x, y, radius, vy) {
    //class에 instance객체를 생성하고 초기화 해주기 위해 필수적
    this.x = x;
    this.y = y;
    this.radius = radius; // 이로써 class 내에서 값에 접근 가능
    this.vy = vy;
  }
  update() {
    this.y += this.vy; // 다른 속도로 움직이게 하기
  }
  draw() {
    // 원 그리기 (x, y, 반지름, 각도시작, 각도끝, 시계/반시계)
    ctx.beginPath();
    ctx.arc(this.x, this.y, this.radius, 0, Math.PI * 2);
    ctx.fillStyle = "#D90368";
    ctx.fill(); //ctx.stroke
    ctx.closePath();
  }
}

// 여러 개 파티클 만들기
const TOTAL = 10;
const randomNumBetween = (min, max) => {
  return Math.random() * (max - min + 1) + min;
};
let particles = [];

for (let i = 0; i < TOTAL; i++) {
  const x = randomNumBetween(0, canvasWidth);
  const y = randomNumBetween(0, canvasHeight);
  const radius = randomNumBetween(50, 100);
  const vy = randomNumBetween(1, 5);
  const particle = new Particle(x, y, radius, vy);
  particles.push(particle);
}

// 기본적으로 모니터 주사율(ex.144hz)에 따라 그리는 횟수가 정해짐. (ex. 1초에 144번)
// 즉, 모니터마다 다른 결과. -> 같은 속도로 동작하게 하려면 fps를 사용하기 -> 60fps 조건에 맞춰보자
let interval = 1000 / 60;
let now, delta;
let then = Date.now();

function animate() {
  window.requestAnimationFrame(animate); // 매 프레임 무한으로 실행되는 함수
  now = Date.now();
  delta = now - then;
  if (delta < interval) return;
  ctx.clearRect(0, 0, canvasWidth, canvasHeight); // canvas를 초기화

  particles.forEach((particle) => {
    particle.update();
    particle.draw();

    // 화면 밖으로 벗어나면 위치, 반지름, 속도를 다시 세팅
    if (particle.y - particle.radius > canvasHeight) {
      particle.y = 0 - particle.radius;
      particle.x = randomNumBetween(0, canvasWidth);
      particle.radius = randomNumBetween(50, 100);
      particle.vy = randomNumBetween(1, 5);
    }
  });

  then = now - (delta % interval);
}
animate();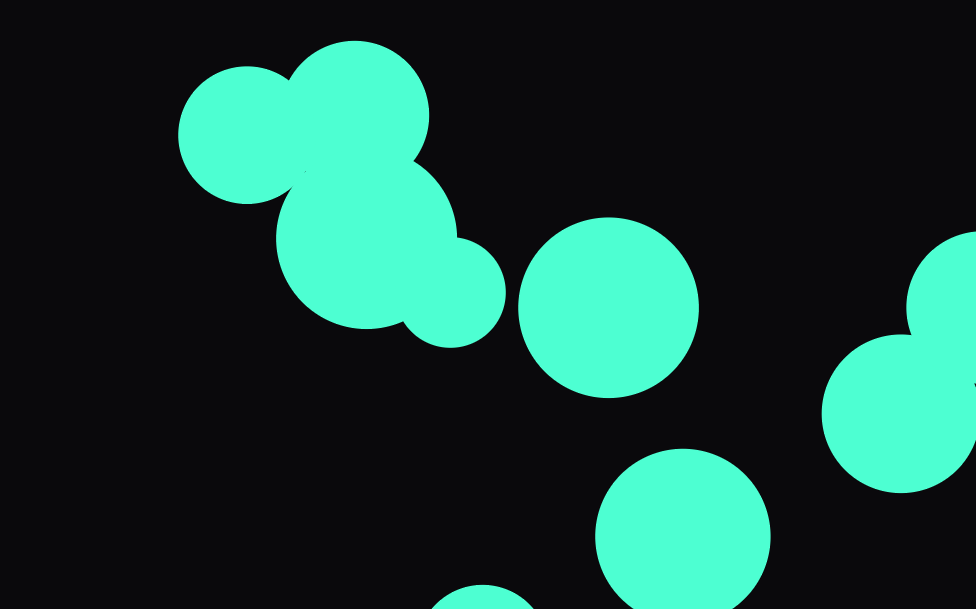
만약에 가속도를 반영하고 싶다면?
vy값에 가속도(acc)를 곱해주자!
class Particle {
  constructor(x, y, radius, vy) {
    //class에 instance객체를 생성하고 초기화 해주기 위해 필수적
    this.x = x;
    this.y = y;
    this.radius = radius; // 이로써 class 내에서 값에 접근 가능
    this.vy = vy;
    this.acc = 1.04; //가속도
  }
  update() {
    this.vy *= this.acc; //가속도 반영
    this.y += this.vy; // 다른 속도로 움직이게 하기
  }
  draw() {
    // 원 그리기 (x, y, 반지름, 각도시작, 각도끝, 시계/반시계)
    ctx.beginPath();
    ctx.arc(this.x, this.y, this.radius, 0, Math.PI * 2);
    ctx.fillStyle = "#4DFFD2";
    ctx.fill(); //ctx.stroke
    ctx.closePath();
  }
}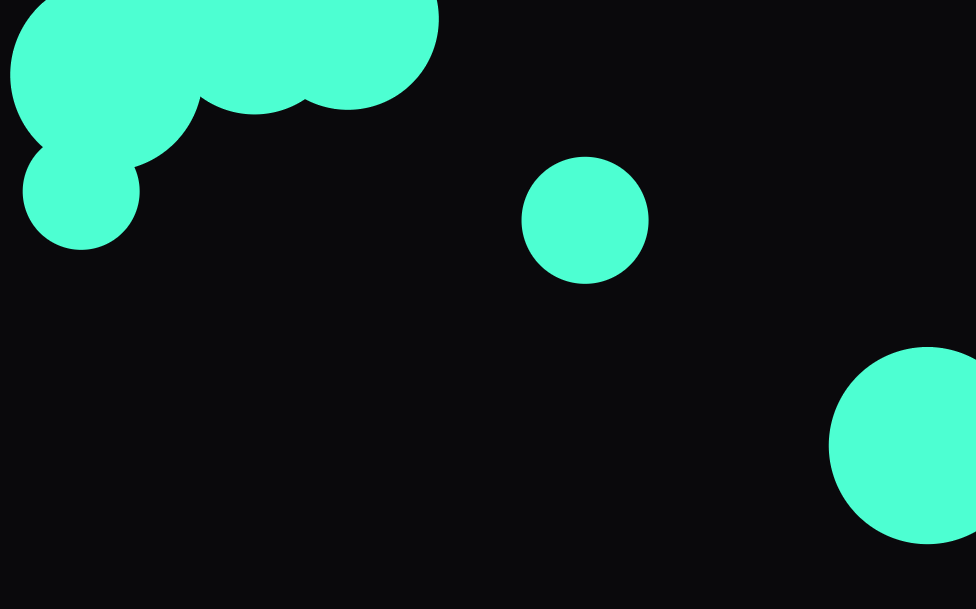
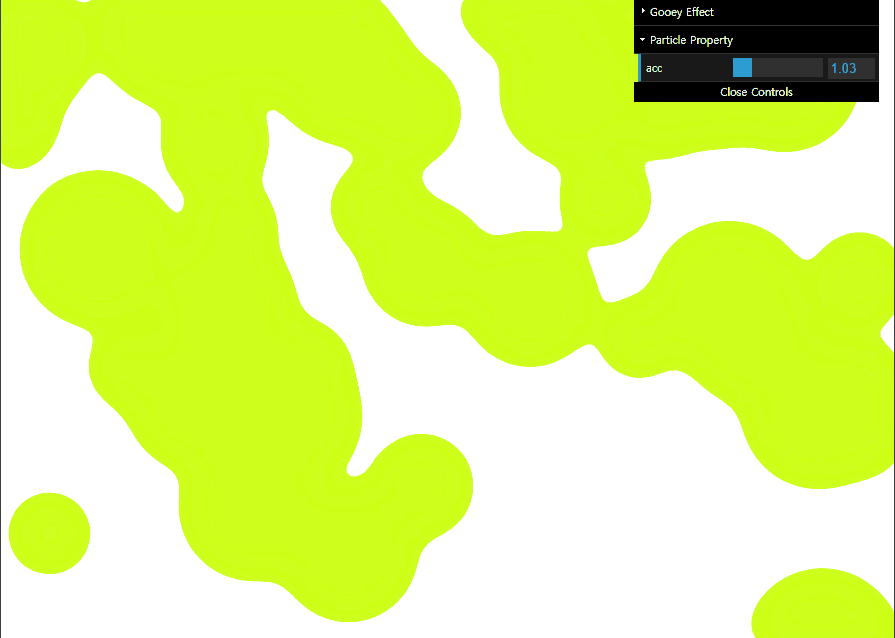
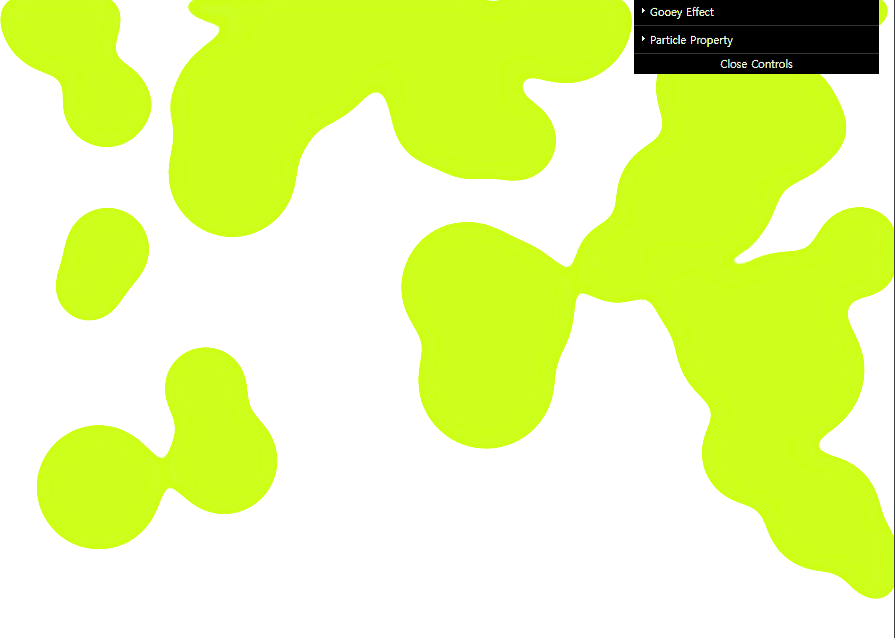
gooey 이펙트를 적용해보자!
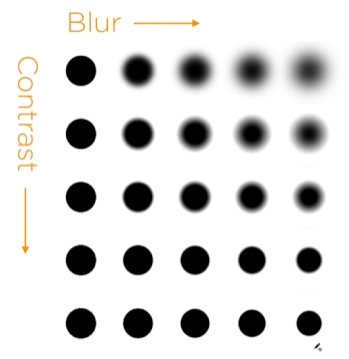
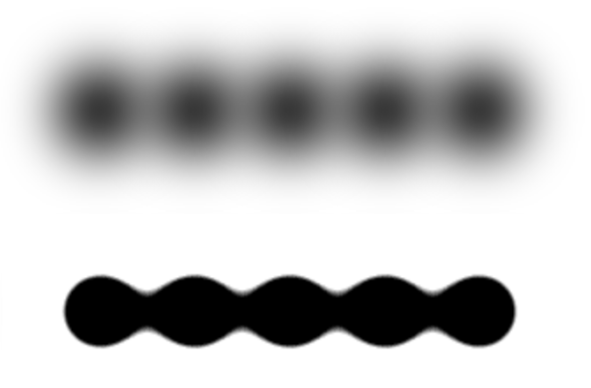
이는 Blur와 Contrast 효과를 같이 줌으로써 표현할 수 있다!
두 파티클이 겹치는 부분에선 blur된 부분이 겹쳐지며 contrast를 줬을 때 이어진 듯한 느낌을 준다.
css filter를 사용하면 아래와 같은 효과를 얻을 수 있다.
canvas {
  background-color: #0a090c;
  width: 100vw;
  height: 100vh;
  filter: blur(20px) contrast(20);
}
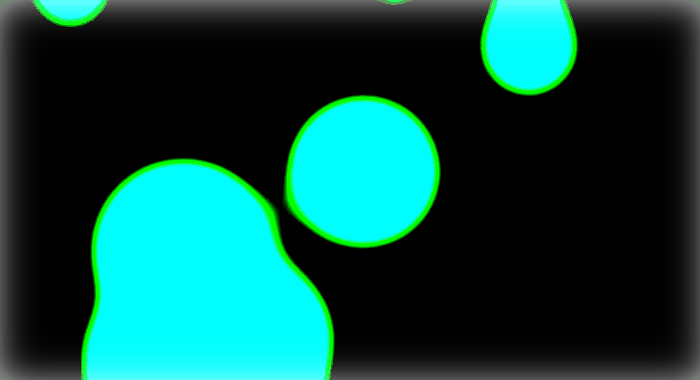
하지만 내가 의도한 것과 다르게 색깔도 바뀌고, 배경색상이 없으면 동작하지 않는다는 점이다.
배경색상에 따라 대비되는 색상으로 변경되어버리는 문제점이 있다.
✨극복 방법
: 일반 CSS 필터를 사용하지 않고, svg의 필터 속성을 활용해 CSS 필터에 우리가 정의한 custom filter를 입혀준다.
<body>
  <canvas id="canvas"></canvas>
  <svg>
    <defs>
      <filter id="gooey">
        <feGaussianBlur stdDeviation="10 10" in="SourceGraphic" result="blur1"/>
         <!--가로 blur, 세로 blur / 필터 이름 blur1-->
         <feColorMatrix type="matrix" values="1 0 0 0 0
         0 1 0 0 0
         0 0 1 0 0
         0 0 0 500 -20" in="blur" result="colormatrix"/>
      </filter>
    </defs>
  </svg>
</body>
// main.css
canvas {
/* background-color: #0a090c;*/
width: 100vw;
height: 100vh;
/* filter: blur(20px) contrast(20); */
filter: url("#gooey");
}
dat-gui를 사용해 편하게 수치를 조절해보자!
dat-gui cdn을 검색해서 head태그내에 붙여넣어주자.
<script src="https://cdnjs.cloudflare.com/ajax/libs/dat-gui/0.7.9/dat.gui.min.js" integrity="sha512-WoO4Ih0CDOSLYafy22wZD/mcJ7k0ESLqtQsFa6zFKnEUrbtuGU+GkLtVhgt93xa2qewG5gKEC6CWlN8OaCTSVg==" crossorigin="anonymous" referrerpolicy="no-referrer"></script>// index.js
// dat.GUI를 활용한 blur, contrast 조절 및 테스트
const feGaussianBlur = document.querySelector("feGaussianBlur");
const feColorMatrix = document.querySelector("feColorMatrix");
const controls = new (function () {
this.blurValue = 19;
this.alphaChannel = 75;
this.alphaOffset = -23;
this.acc = 1.03;
})();
let gui = new dat.GUI();
const f1 = gui.addFolder("Gooey Effect");
f1.add(controls, "blurValue", 0, 100).onChange((value) => {
feGaussianBlur.setAttribute("stdDeviation", value);
}); //contros, 이름, 최소, 최대
f1.add(controls, "alphaChannel", 1, 500).onChange((value) => {
feColorMatrix.setAttribute(
"values",
`1 0 0 0 0 0 1 0 0 0 0 0 1 0 0 0 0 0 ${value} ${controls.alphaOffset}`
);
});
f1.add(controls, "alphaOffset", -40, 40).onChange((value) => {
feColorMatrix.setAttribute(
"values",
`1 0 0 0 0 0 1 0 0 0 0 0 1 0 0 0 0 0 ${controls.alphaChannel} ${value}`
);
});
const f2 = gui.addFolder("Particle Property"); // 폴더없이 하려면 gui.add~~하면된다.
f2.open();
f2.add(controls, "acc", 0.9, 1.5, 0.01).onChange((value) => {
particles.forEach((particle) => (particle.acc = value));
});
마지막 !
현재 화면이 resize되어도 즉각 반영되지 않는 문제가 있다.
window에 기본적으로 내장된 resize event를 이용해서 이를 해결해보자. 코드를 아래와 같이 수정하면 된다. (찐 최종!)
const canvas = document.querySelector("canvas");

const ctx = canvas.getContext("2d");
const dpr = window.devicePixelRatio;

// 화면 resize 감지해서 반영시키기
let canvasWidth;
let canvasHeight;
let particles;

function init() {
  canvasWidth = innerWidth;
  canvasHeight = innerHeight;
  canvas.style.width = canvasWidth + "px";
  canvas.style.height = canvasHeight + "px";
  canvas.width = canvasWidth * dpr;
  canvas.height = canvasHeight * dpr;
  ctx.scale(dpr, dpr);

  particles = [];
  const TOTAL = canvasWidth / 20;

  for (let i = 0; i < TOTAL; i++) {
    const x = randomNumBetween(0, canvasWidth);
    const y = randomNumBetween(0, canvasHeight);
    const radius = randomNumBetween(20, 40);
    const vy = randomNumBetween(1, 2);
    const particle = new Particle(x, y, radius, vy);
    particles.push(particle);
  }
}

// dat.GUI를 활용한 blur, contrast 조절 및 테스트
const feGaussianBlur = document.querySelector("feGaussianBlur");
const feColorMatrix = document.querySelector("feColorMatrix");

const controls = new (function () {
  this.blurValue = 19;
  this.alphaChannel = 75;
  this.alphaOffset = -23;
  this.acc = 1.03;
})();
let gui = new dat.GUI();

const f1 = gui.addFolder("Gooey Effect");
f1.add(controls, "blurValue", 0, 100).onChange((value) => {
  feGaussianBlur.setAttribute("stdDeviation", value);
});
f1.add(controls, "alphaChannel", 1, 500).onChange((value) => {
  feColorMatrix.setAttribute(
    "values",
    `1 0 0 0 0  0 1 0 0 0  0 0 1 0 0  0 0 0 ${value} ${controls.alphaOffset}`
  );
});
f1.add(controls, "alphaOffset", -40, 40).onChange((value) => {
  feColorMatrix.setAttribute(
    "values",
    `1 0 0 0 0  0 1 0 0 0  0 0 1 0 0  0 0 0 ${controls.alphaChannel} ${value}`
  );
});

const f2 = gui.addFolder("Particle Property"); // 폴더없이 하려면 gui.add~~하면된다.
f2.open();
f2.add(controls, "acc", 0.9, 1.5, 0.01).onChange((value) => {
  particles.forEach((particle) => (particle.acc = value));
});

// 파티클 생성
class Particle {
  constructor(x, y, radius, vy) {
    //class에 instance객체를 생성하고 초기화 해주기 위해 필수적
    this.x = x;
    this.y = y;
    this.radius = radius; // 이로써 class 내에서 값에 접근 가능
    this.vy = vy;
    this.acc = 1.03; //가속도
  }
  update() {
    this.vy *= this.acc; //가속도 반영
    this.y += this.vy; // 다른 속도로 움직이게 하기
  }
  draw() {
    // 원 그리기 (x, y, 반지름, 각도시작, 각도끝, 시계/반시계)
    ctx.beginPath();
    ctx.arc(this.x, this.y, this.radius, 0, Math.PI * 2);
    ctx.fillStyle = "#CEFF1A";
    ctx.fill(); //ctx.stroke
    ctx.closePath();
  }
}

const randomNumBetween = (min, max) => {
  return Math.random() * (max - min + 1) + min;
};

let interval = 1000 / 60;
let now, delta;
let then = Date.now();

function animate() {
  window.requestAnimationFrame(animate);
  now = Date.now();
  delta = now - then;
  if (delta < interval) return;
  ctx.clearRect(0, 0, canvasWidth, canvasHeight); // canvas를 초기화

  particles.forEach((particle) => {
    particle.update();
    particle.draw();

    // 화면 밖으로 벗어나면 위치, 반지름, 속도를 다시 세팅
    if (particle.y - particle.radius > canvasHeight) {
      particle.y = 0 - particle.radius;
      particle.x = randomNumBetween(0, canvasWidth);
      particle.radius = randomNumBetween(30, 70);
      particle.vy = randomNumBetween(1, 5);
    }
  });

  then = now - (delta % interval);
}

// load 완료되면 init과 animate 함수 실행
window.addEventListener("load", () => {
  init();
  animate();
});
// resize 이벤트 감지
window.addEventListener("resize", () => {
  init();
});
참고하면 좋을 링크들
'JavaScript' 카테고리의 다른 글
| Canvas 태그를 사용해보자 (3) - 폭죽 파티클 (0) | 2023.12.10 |
|---|---|
| Canvas 태그를 사용해보자 (1) - 사이즈 조절하기 (1) | 2023.12.05 |
| [배포] API 키 숨기기 (0) | 2023.09.30 |
| 클래스를 활용해 js로 html 수정하기 (0) | 2023.08.21 |
| [JS] 정규 표현식 (정규식, RegExp) (0) | 2023.08.21 |


