솔미는 성장중
Canvas 태그를 사용해보자 (3) - 폭죽 파티클 본문
해당 작업을 하면서 새롭게 배운 부분 또는 정리해두면 좋을 내용만 자세히 작성하였다! (여기 코드만 보고는 전체를 이해하기는 힘들 것 같다. 풀 코드와 함께 보는 것을 추천한담.)
https://github.com/SOL-MI/Canvas-Practice/tree/main/2.%20%EB%B6%88%EA%BD%83%EB%86%80%EC%9D%B4
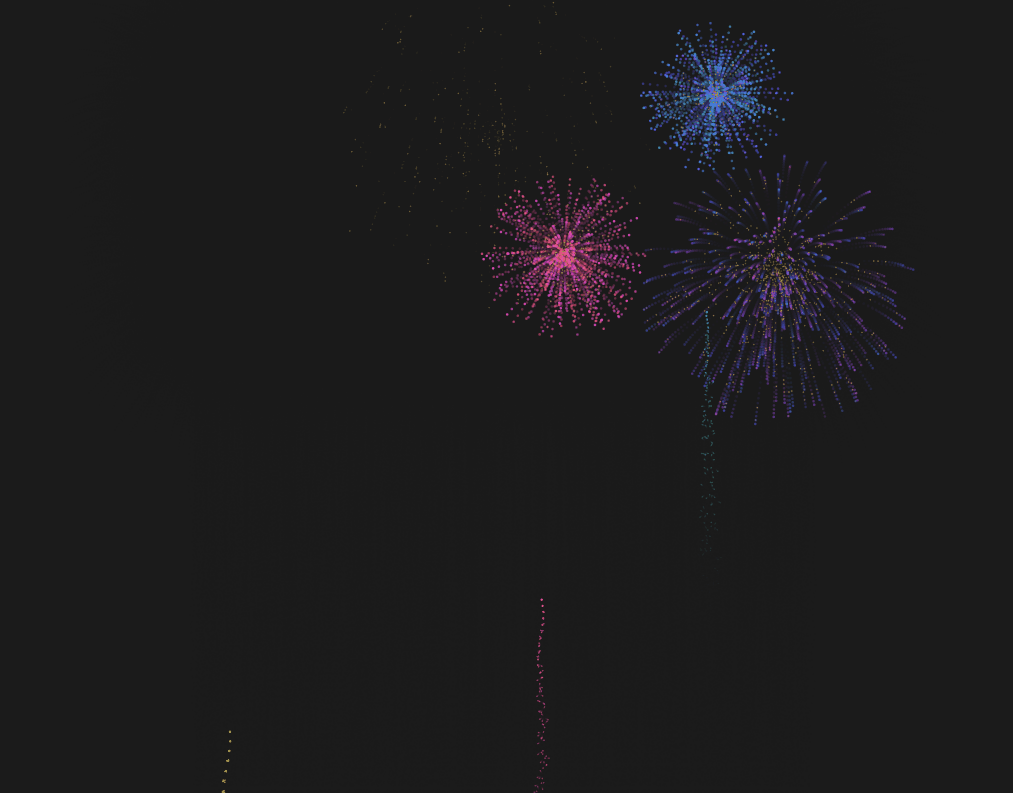
원 모양으로 폭죽 퍼지게 하기
// utils.js
export const hypotenuse = (x, y) => {
  return Math.sqrt(Math.pow(x, 2) + Math.pow(y, 2));
};

// index.js
createParticles(x, y, colorDeg) {
    const PARTICLE_NUM = 400;
    for (let i = 0; i < PARTICLE_NUM; i++) {
      const r =
        randomNumBetween(2, 100) * hypotenuse(innerWidth, innerHeight) * 0.0001;
      const angle = (Math.PI / 180) * randomNumBetween(0, 360);

      const vx = r * Math.cos(angle);
      const vy = r * Math.sin(angle);
      const opacity = randomNumBetween(0.6, 1);
      const _colorDeg = randomNumBetween(-30, 30) + colorDeg;
      this.particles.push(new Particle(x, y, vx, vy, opacity, _colorDeg));
    }
  }
삼각함수를 이용해서 원 모양으로 퍼지게 만들었다.
이렇게 안하면 네모나게 퍼진닷..
hsla를 이용한 색깔 랜덤 적용
this.ctx.fillStyle = `hsla(${this.colorDeg},100%, 65%, ${this.opacity})`;hsl(hue, saturation, lightness)을 의미한다.
hue는 0~360도를 이용해 색깔을 표현한다. 따라서 colorDeg를 랜덤으로 변하는 숫자로 받아오면 랜덤 색깔 표현이 가능하다!
그리고 saturation과 lightness는 채도와 밝기, a는 opacity를 이야기한다.
꼬리가 끝나는 지점에서 폭죽이 터지게.
// Tail.js 일부
 constructor(x, vy, colorDeg) {
   super();
   this.y = this.canvasHeight;
   this.vy = vy;
   this.friction = 0.985;
 }
update() {
  this.vy *= this.friction;
  this.y += this.vy;
}

// index.js 일부
createTails() {
    const x = randomNumBetween(this.canvasWidth * 0.2, this.canvasWidth * 0.8);
    const vy = this.canvasHeight * randomNumBetween(0.01, 0.015) * -1; //랜덤 높이를 위한 장치
    const colorDeg = randomNumBetween(0, 360);
    this.tails.push(new Tail(x, vy, colorDeg));
}
  // 꼬리 삭제 및 폭죽 생성
if (tail.vy > -0.7) {
  this.tails.splice(index, 1);
  this.createParticles(tail.x, tail.y, tail.colorDeg); //tail에서 y를 가져온다.
}
tail.y는 전체 높이에서 friction을 곱해준 값이다. friction이 1보다 작으므로 어느정도 높이에서 수렴하게 되는 것을 이용!
그리고 그 높이 값을 createParicles를 할 때 넣어주었다.
파티클 삭제
- opacity가 0보다 작아졌을 때.
- 가속도가 기준 이하가 됐을 떄
파티클을 배열안에 넣어줘서 화면에 뿌려주고 있는데, 꼭 splice(index,1)을 해서 삭제해주자. 기준은 두 가지 기준을 사용했다.
예시 - 가속도가 작아졌을 때 (아래에서 위로 올라가니까 큰 음수이다가 터질 때쯤엔 가속도가 줄어드는 것을 이용)
 // 꼬리 삭제 및 폭죽 생성
if (tail.vy > -0.7) {
  this.tails.splice(index, 1);
  this.createParticles(tail.x, tail.y, tail.colorDeg);
}
잔상 남기기 및 폭죽 터질 때 밝아지는 효과
그려둔 것이 사라지는 것처럼 보이는 이유는 배경을 덮기 때문이다.
밝아질 때는 밝은 배경으로 덮으면 된다.
// 투명도 있게 배경 칠해서 잔상 남기기
this.ctx.fillStyle = this.bgColor + "40"; //#00000010
this.ctx.fillRect(0, 0, this.canvasWidth, this.canvasHeight);
// 배경 밝아지게
this.ctx.fillStyle = `rgba(255,255,255,${this.particles.length / 40000})`;
this.ctx.fillRect(0, 0, this.canvasWidth, this.canvasHeight);'JavaScript' 카테고리의 다른 글
| Canvas 태그를 사용해보자 (2) - gooey 효과를 적용한 무작위 파티클 만들기 ! (3) | 2023.12.05 |
|---|---|
| Canvas 태그를 사용해보자 (1) - 사이즈 조절하기 (1) | 2023.12.05 |
| [배포] API 키 숨기기 (0) | 2023.09.30 |
| 클래스를 활용해 js로 html 수정하기 (0) | 2023.08.21 |
| [JS] 정규 표현식 (정규식, RegExp) (0) | 2023.08.21 |


